

Part 3: Testing
In the software development world, there are usually two types of tests for code: a ‘Unit Test’ and an ‘Integration Test’. Unit Tests check small parts of your code (in Dynamo, this would be testing individual nodes) to see if it works correctly and Integration Tests check that your code works inside of the programme it’s built for.
Dynamo has a robust approval process for new code that requires multiple Unit and Integration Tests, performance checks and code reviews; often the code for testing is actually more complex than the code needed for the function of the new node itself. These tests are important though, as they ensure that anything new does not impact another part of the code base.
Therefore, we need both kinds of tests for contributing to Dynamo for Revit: the first (Unit Test) to check our code works as expected and then the second (Integration Test) to see if it functions in the overall Dynamo environment.
Revit Test Framework (RTF)
Running code tests in DynamoRevit is relatively complex. This is because we need to run these tests inside Revit itself to check that everything works correctly for and on the platform.
To help with this process, the Dynamo team has developed the ‘Revit Tests Framework’ (RTF), which provides a supporting framework and instructions on how to complete tests for Revit contributions. To access the RTF, go to the repo and clone it. Open it in Visual Studio (making sure to restore nuget packages) and then rebuild the solution.
When you've done this, inside the RTF repository go to: bin > AnyCPU > Debug. You should find the ‘RevitTestFrameworkGUI’ application.

Dynamo.config
Now that you have the RTF on your machine, the next step is to connect DynamoRevit with DynamoCore.
If you haven’t already, build your DynamoRevit solution and find the ‘Dynamo.config’ file in bin > AnyCPU > Debug.
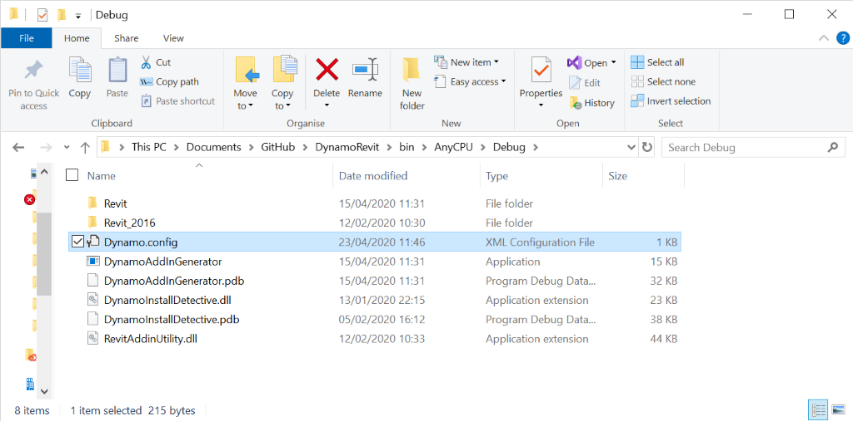
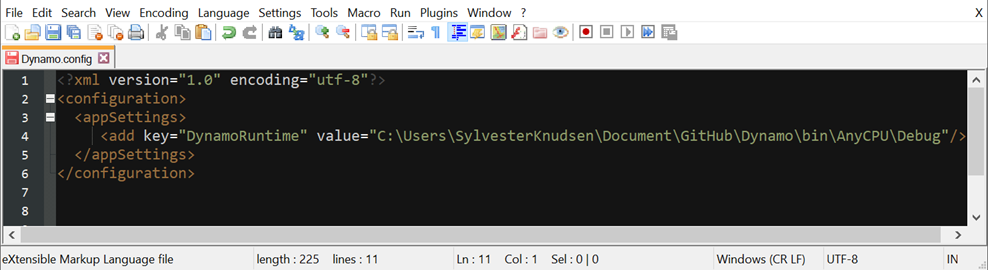
Open the ‘Dynamo.config file’ and replace the path after ‘value=’ with the path to your own DynamoCore location. If you have a local build of Dynamo, the path will probably look something like the one in the image below.
This is also the way you can force update the DynamoCore version in Revit (please remember this is not recommended or supported by the Dynamo team).
One thing to note here is that, every time you rebuild your solution, this file will be overwritten; you’ll need to add this path each time you do it.
Dynamo addins
The last step of the setup process is to create an addin file so Revit knows about your new DynamoRevit plugin.
To do this, create a new file with the ‘.addin’ extension in this location: C:\ProgramData\Autodesk\Revit\Addins\{YourVersion}\AddIns.
Create the .addin file and add the following path: [SK will send but format it on the website itself].

If you’re using Revit 2020 or higher, please note that there’s a version of DynamoCore and the DynamoRevit addin included in the Revit install folder. If this is the case for you, make sure to remove (or delete)the DynamoForRevit addin folder from the following location: C:\ProgramFiles\Autodesk\Revit 2020\AddIns.
Running tests
Now we’re ready to run the tests! While we won't go into detail about how you write them here, if you’re new to this practice then I suggest you look through the existing tests in the DynamoRevit repo to find out more. Here’s an example of one test that we did recently.
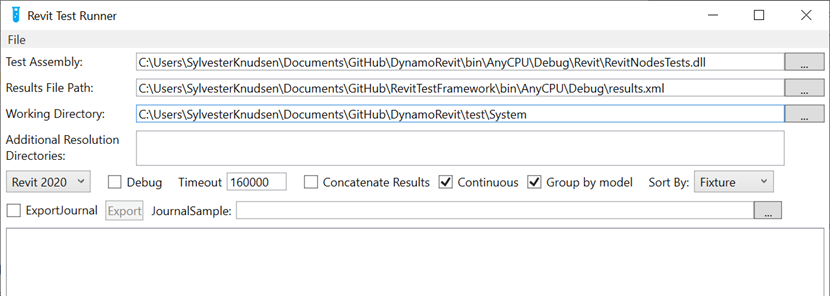
To run your tests, open the RevitTestFrameworkGUI. You’ll need to specify two paths - the‘Test Assembly’ path and the ‘Working Directory’.
The Test Assembly is the DLL that contains our tests. All of our Unit Tests need to go into the ‘RevitNodesTests’ project in our solution, so make sure to point to this DLL in your Test Assembly. If you’re doing Integration Tests, use the ‘RevitSystemTests’ project instead.
The Working Directory is essential because we need to run our tests inside Revit and DynamoRevit, and so we need to make sure that RTF knows which models and graphs it should open when running the tests. When you’re writing tests, you have to specify which Revit model that the test should run in. If it's an integration test, we also need to specify which .dyn file it should execute. And finally we need to make sure that all our test models and .dyn files are in a common folder so the RTF always can find them.
Do this in the following folder: DynamoRevit > tests >System. This folder is our working directory and you should always add your tests models and .dyn files here.
There are other settings that you can make to the RTF but we won't go into detail about them here. To find out more, head to the RTF Github.
Save your configuration once you’ve finished your setup of the RTF - you can do this from the ‘File’ menu.
Finally, select and run the tests you want to run. Hopefully all your tests turn green, which means they passed and your code is working as expected. However, if some of them have turned red and failed, then something isn’t working and you’ll need to go back and fix it.

And that’s your tests done! In the final part of this series, we'll explain how to complete your contribution by submitting a pull request to the Dynamo team.
A guide on contributing to Dynamo for Revit - Part 4
A guide on contributing to Dynamo for Revit - Part 2
A guide on contributing to Dynamo for Revit - Part 1
Subscribe to Our Newsletter
